last update: 2024/04
開発環境/IDE:Renesas CCRX (e² studio)
| 圧縮・解凍 | emCompress-Embed, emCompress-ToGo |
|---|---|
| Modbus | Modbus/TCP/ASCII/RTU Master, Modbus/TCP/ASCII/RTU Slave |
| TCP/IP | emNet TCP/IPv4, Web Server, CoAP Server / Client, MQTT Client Publisher / Subscriber, DHCP Server, (m)DNS/LLMNR/DNS-SD Server, NetBIOS Name Service, FTP Server / Client, TELNET, TFTP, SMTP Client, SNMP Agent, SNTP Client, WebSocket, emNet driver for RX |
| セキュリティ | SSH Secure Shell, SSL / TLS Secure Sockets Layer, emSecure (RSA Sign and Verify) |
| 暗号・サイファー | emCrypt PRO (Ciphers, HASH, MAC, Digital Signature, Key Generation, NIST prime curves, random bit generators) |
| IoT Toolkit | HTTP Client, JSON Parser |
| FileSystem | emFile FAT32, Encryption, Journaling, Disk Driver (MMC/SD Card, USB Disk, RAMDisk) |
| USB-Host | emUSB Host, BULK, HID, CDC, FT232, CCID, AUDIO, MSD, MIDI, MTP, LAN, Printer Class, RX Driver |
リリースプログラムの「RX72N_EnvisionKit」及び「Windows」フォルダを、開発環境インストール済みのユーザーパソコンのローカルドライブにコピーします。Windowsインストーラは不要です。
[Workspace]
 ├ RX72N_EnvisionKit   .... サンプルプログラム一式
 └ Windows   .............. テスト用PCツール
RX72N_EnvisionKit
 ├ License.txt   ............. 評価版ライブラリの利用条件
 ├ src
   ├ Application ............. テスト用サンプルアプリケーション
   ├ BSP         ............. ハードウエア依存設定、ドライバ
   ├ Config      ............. コンフィグレーション設定、システム依存設定
   ├ EVAL_Libs   ............. SEGGERソフトウエア評価版ライブラリ
   ├ FreeRTOS    ............. FreeRTOSカーネルソース(e² studio FITで作成)
   ├ frtos_config    ......... FreeRTOSコンフィグレーション設定
   ├ frtos_skeleton  ......... FreeRTOS関連
   ├ frtos_startup   ......... FreeRTOSスタートアップコード(ボード依存)
   ├ smc_gen     ........ e² studioのスマートFITコンフィグレータで作成されたBSP
   ├ .project    ............. e² studio環境用プロジェクト
   └ rx72n_envisionkit_freertos.scfg ..... e² studio FITコンフィグレータ設定
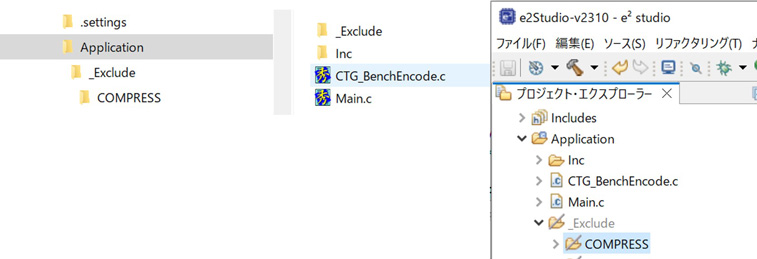
Application
 ├ Main.c      ...... メインエントリハンドラ
 ├ Console     ...... ログ表示用GUIコンソールプログラム
 └ _Exclude    ...... ※このフォルダはビルド対象外に設定しています
     ├ COMPRESS  .... 圧縮・解凍機能のデモサンプル
     ├ CRYPTO    .... 暗号・サイファー機能のデモサンプル
     ├ FS        .... ファイルシステムのテストサンプル
     ├ IOT       .... HTTPクライアント、JSONパーサー機能のデモサンプル
     ├ IP        .... TCP/IPネットワーク通信機能のデモサンプル
     ├ MB        .... MODBUS MASTER / SLAVE機能のデモサンプル
     ├ SECURE    .... 不正改造・不正量産を防ぐセキュリティソリューション
     ├ SSH       .... SSH セキュアログイン機能のデモサンプル
     ├ SSL       .... SSL 通信機能のデモサンプル
     └ USBH      .... USB Host各種クラス機能のデモサンプル
RX72N_EnvisionKit
 └ BSP
    ├ BSP.c    ......... ボード上のLEDインターフェースのドライバ
    ├ BSP_UART.c  ...... ボード上のUARTインターフェース(CN8)のドライバ
    ├ BSP_IP.c    ...... LAN/PHYドライバ関連のハードウエア依存の設定・割込みハンドラ
    ├ BSP_MMC_SD.c  .... SDコントローラのハードウエア依存の初期化設定
    ├ BSP_USB.c   ...... USBコントローラのハードウエア依存の初期化設定・割込みハンドラ
    ├ Setup    ......... 各ソフトウエアライブラリのハードウエア依存のドライバ設定
    └ emWin  ........... コンソール用GUIライブラリ(emWin for RX)
ボードのクロック・PLL設定はFITコンフィグレータで行います。
メインクロック:16MHz
FlashIFクロック(FCLK):60MHz
システムクロック(ICLK):240MHz
周辺モジュールクロック(PCLKA):120MHz
周辺モジュールクロック(PCLKB):60MHz周辺モジュールクロック(PCLKC):60MHz
周辺モジュールクロック(PCLKD):60MHz
外部バスクロック(BCLK):80MHz
USBクロック:48MHz
CLKOUT25Mクロック:25MHz
※スマートFITコンフィグレータ設定内容の確認及び変更する場合は、以下の手順をご参照ください。
SU,SI,B_1,R_1,B_2,R_2,B,R,B_8,R_8/04,PResetPRG,C_1,C_2,C,C_8,C$*,D*,W*,L,P/0FFC00000,EXCEPTVECT/0FFFFFF80,RESETVECT/0FFFFFFFC
| 0x0000_0004 | SU, SI, B_1, R_1, B_2, R_2, B, R, B_8, R_8 |
| 0xFFC0_0000 | PResetPRG, C_1, C_2, C, C_8, C$*, D*, W*, L, P |
| 0xFFFF_FF80 | EXCEPTVECT |
| 0xFFFF_FFFC | RESETVECT |
#define configUSE_PREEMPTION            1
#define configUSE_IDLE_HOOK             1
#define configUSE_TICK_HOOK             1
#define configCPU_CLOCK_HZ              (BSP_ICLK_HZ)
#define configPERIPHERAL_CLOCK_HZ       (BSP_PCLKB_HZ)
#define configTICK_RATE_HZ              (( TickType_t ) 1000)
#define configMINIMAL_STACK_SIZE        (( unsigned short ) 140)
#define configTOTAL_HEAP_SIZE_N         (30)
#define configTOTAL_HEAP_SIZE           (( size_t ) ( configTOTAL_HEAP_SIZE_N * 1024 ))
#define configMAX_TASK_NAME_LEN         (12)
#define configUSE_TRACE_FACILITY        1
#define configUSE_16_BIT_TICKS          0
#define configIDLE_SHOULD_YIELD         1
#define configUSE_CO_ROUTINES           0
#define configUSE_MUTEXES               1
#define configGENERATE_RUN_TIME_STATS   0
#define configCHECK_FOR_STACK_OVERFLOW  2
#define configUSE_RECURSIVE_MUTEXES     1
#define configQUEUE_REGISTRY_SIZE       0
#define configUSE_MALLOC_FAILED_HOOK    1
#define configUSE_APPLICATION_TASK_TAG  0
#define configUSE_QUEUE_SETS            1
#define configUSE_COUNTING_SEMAPHORES   1
#define configMAX_PRIORITIES            (16)
#define configMAX_CO_ROUTINE_PRIORITIES (2)
#define configUSE_TASK_NOTIFICATIONS     1
#define configUSE_TASK_DPFPU_SUPPORT     0
#define configRECORD_STACK_HIGH_ADDRESS  0
#define configNUM_THREAD_LOCAL_STORAGE_POINTERS  0

/* Dynamic allocation and static allocation. */
#define configSUPPORT_DYNAMIC_ALLOCATION        1
#define configSUPPORT_STATIC_ALLOCATION         0

/* Run time stats gathering definitions. */
unsigned long ulGetRunTimeCounterValue( void );
void vConfigureTimerForRunTimeStats( void );
#define configGENERATE_RUN_TIME_STATS    0

/* Software timer definitions. */
#define configUSE_TIMERS                1
#define configTIMER_TASK_PRIORITY       (6)
#define configTIMER_QUEUE_LENGTH        5
#define configTIMER_TASK_STACK_DEPTH    (configMINIMAL_STACK_SIZE)

/* The interrupt priority used by the kernel itself for the tick interrupt and
the pended interrupt.  This would normally be the lowest priority. */
#define configKERNEL_INTERRUPT_PRIORITY         1

/* The maximum interrupt priority from which FreeRTOS API calls can be made.
Interrupts that use a priority above this will not be effected by anything the
kernel is doing. */
#define configMAX_SYSCALL_INTERRUPT_PRIORITY    14

/* The peripheral used to generate the tick interrupt is configured as part of
the application code.  This constant should be set to the vector number of the
peripheral chosen.  As supplied this is CMT0. */
#define configTICK_VECTOR               _CMT0_CMI0

/* Set the following definitions to 1 to include the API function, or zero
to exclude the API function. */

#define INCLUDE_vTaskPrioritySet            1
#define INCLUDE_uxTaskPriorityGet           1
#define INCLUDE_vTaskDelete                 1
#define INCLUDE_vTaskCleanUpResources       0
#define INCLUDE_vTaskSuspend                1
#define INCLUDE_vTaskDelayUntil             1
#define INCLUDE_vTaskDelay                  1
#define INCLUDE_uxTaskGetStackHighWaterMark 1
#define INCLUDE_xTaskGetSchedulerState      1
#define INCLUDE_eTaskGetState               1
#define INCLUDE_xTimerPendFunctionCall      1

void vAssertCalled( void );
#define configASSERT( x ) if( ( x ) == 0 ) vAssertCalled()

/* Override some of the priorities set in the common demo tasks.  This is
required to ensure flase positive timing errors are not reported. */
#define bktPRIMARY_PRIORITY     (( configMAX_PRIORITIES - 3 ))
#define bktSECONDARY_PRIORITY   (( configMAX_PRIORITIES - 4 ))
#define intqHIGHER_PRIORITY     (( configMAX_PRIORITIES - 3 ))


/*-----------------------------------------------------------
 * Ethernet configuration.
 *-----------------------------------------------------------*/

/* MAC address configuration. */
#define configMAC_ADDR0 0x01
#define configMAC_ADDR1 0x12
#define configMAC_ADDR2 0x13
#define configMAC_ADDR3 0x10
#define configMAC_ADDR4 0x15
#define configMAC_ADDR5 0x11

/* IP address configuration. */
#define configIP_ADDR0      192
#define configIP_ADDR1      168
#define configIP_ADDR2      0
#define configIP_ADDR3      200

/* Netmask configuration. */
#define configNET_MASK0     255
#define configNET_MASK1     255
#define configNET_MASK2     255
#define configNET_MASK3     0

/* When the FIT configurator or the Smart Configurator is used, platform.h has to be used. */
#define configINCLUDE_PLATFORM_H_INSTEAD_OF_IODEFINE_H  1
評価版パッケージのサンプルプロジェクトはe² studio IDE環境でビルド・デバッグ可能です。
e² studioプロジェクトのビルド構成:HardwareDebug
RX72N_EnvisionKit
 ├ HardwareDebug   ............... 出力フォルダ(e² studio環境プロジェクト)
 ├ .cproject   ................... e² studio環境用プロジェクト
 ├ .project    ................... e² studio環境用プロジェクト
デバッグツールはオンボード RX E2 Lite を使用します。評価ボードのECN1 USB micro-Bコネクタをパソコンに接続してe² studio又はCS+ IDE環境からプログラムのダウンロード及びステップ・実行デバッグ操作が可能です。
評価ボードの SW1 DIPスイッチを以下のように設定します。
GUIコンソール用emWinグラフィックライブラリ及びコンフィグレーション設定ファイルは以下URL(SEGGER社WEB)からダウンロードしましたemWin for RXパッケージを利用します。
https://www.segger.com/downloads/emwin/emWin_RX65N_RX72N_Envision_Kit.zip
BSP
 └ emWin
    ├ Config  ...... LCDドライバ、システム依存コンフィグレーション設定
    └ GUI  ......... GUIライブラリ(GUILib.lib)、ヘッダファイル
emWinプログラムは以下のコンフィグレーション設定を使用します。
カラーモード:4bpp
ビデオバッファ-1:0x00800000 ~ 0x00810FFF
ビデオバッファ-2:0x00811000 ~ 0x00821FFF
File: Config\LCDConf.c (LCDドライバ設定)
#define BITS_PER_PIXEL 4 // Allowed values: 1, 4, 8, 16, 32
File: Config\r_emwin_rx_config.h
#define EMWIN_USE_DRW2D 0
#define EMWIN_GUI_FRAME_BUFFER1       0x00800000
#define EMWIN_GUI_FRAME_BUFFER2       0x00811000
Application
 ├ Console
    ├ GUI_Console.c  .... ログ表示用GUIコンソールプログラム
    ├ GUI_Console.h  .... API定義
アプリケーション初期化後にmainハンドラでConsole_Init()関数を実行してGUIコンソールを起動します。
int main(void) {
   .....
#if 1   /* 0: disable GUI console for Faster performance */
  Console_Init();   /* GUI console setup */
#endif
   .....
  MainTask();   /* run application  */
GUIコンソールを有効に設定されている場合は、プログラム実行処理に負荷がかかります。
GUIコンソール表示が不要になりましたら、以下のようにConsole_Init()関数実行を無効に設定してご利用ください。
File: Main.c
int main(void) {
   .....
#if 0   /* 0: disable GUI console for Faster performance */
  Console_Init();   /* GUI console setup */
#endif
   .....
MainTask(); /* run application */SEGGER's Friendly License (SFL), January 16th 2020
For non-commercial use or for evaluation purposes, you - regardless whether you
are an individual person or a legal entity - are welcome to use the software
free of charge under this license.
Any other use of the software is considered commercial use, for which a
commercial-use license must be obtained from SEGGER.
DEFINITIONS
"Non-commercial use" means using the software for teaching, learning, studying,
or projects that do not have a commercial background. If the software is used
for products or services intended to be sold, the use is considered to be
commercial.
"Evaluation" means you are trying out the software for possible future use.
While the length of this time period is up to you, once it becomes a standard
part of your workflow we no longer consider it evaluation.
DISCLAIMER OF WARRANTY
When using the software under this license, you accept that it is provided on
an "as is" basis, without warranty of any kind.
LIMITATION OF LIABILITY
When using the software under this license, you accept that SEGGER is not liable
for any damages arising out of the use of or inability to use the software.
3RD-PARTY SOFTWARE AND LICENSES
More information about 3rd-party components, if any, included in the software
and the licenses that these components are under can be found in the file
doc/license/3rd-party.txt after installation of the software.
RESTRICTIONS
You may not:
(a) decompile, disassemble, reverse engineer, or otherwise attempt to derive the
source code of the software,
(b) redistribute, encumber, sell, rent, lease, sublicense, or otherwise transfer
rights in the software,
(c) remove or alter any trademark, logo, copyright or other proprietary notices,
legends, symbols or labels of the software.
REVOCATION
SEGGER reserves the right to revoke the right to use the software granted by
this license on a case-by-case basis. In this unlikely event, SEGGER will
provide the revocation notice in writing, allowing an adequate notice period.
APPLICABLE LAW, VENUE
German Law (with the exception of its rules for Conflicts of Law) applies.
Sole venue is Monheim/Rhein.
(c) 2020 - 2021 SEGGER Microcontroller GmbH www.segger.com info@segger.comCopyright © 2025 EmbITeK Co., Ltd. All Rights Reserved.